


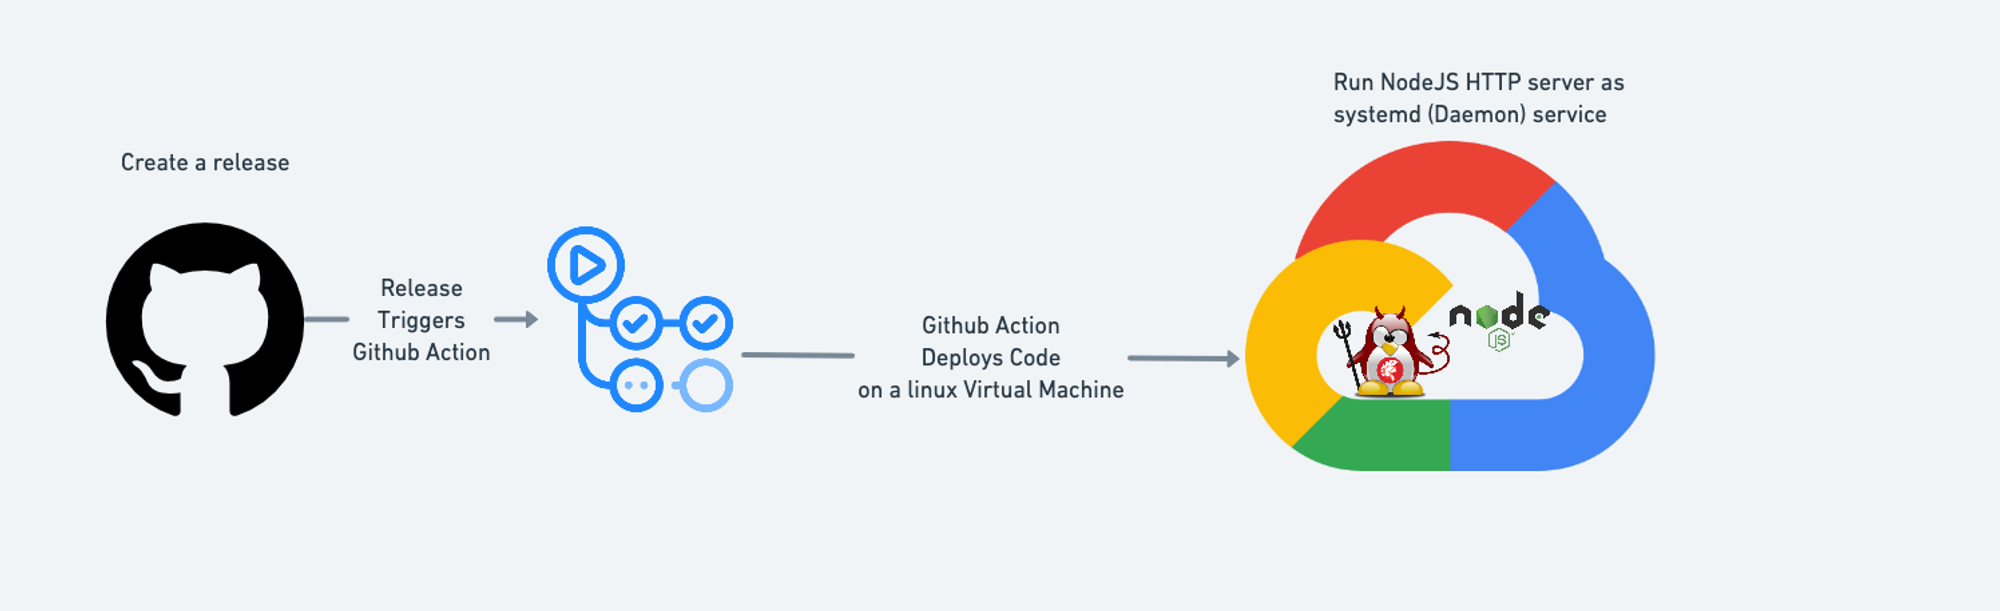
Docker and kubernetes are great for automating deployment, scaling, and management of containerized applications. But it comes with extra cost of resource management. Often it is found that this processes itself would require some resources to run and execute the servers. We can totally avoid this complexity by using
systemd services. The name systemd adheres to the Unix convention of naming daemons by appending the letter d. It provides array of system components for linux operating system.In this blog post we will see how we can deploy a NodeJS server on linux machine and automate the deployment with github actions. But it is not only limited to NodeJS ideally you can deploy any daemon/long running processes using
systemd.Quick demo

Let's get started!
Step 1: Create a HTTP server or any long running process.
- Initialize node project
npm init -y
- Install dependencies
npm install expres
- Create
index.jswith following content
const express = require('express')
const app = express()
const port = 3000

app.get('/', (req, res) => {
  res.send('Hello World!')
})

app.listen(port, () => {
  console.log(`Example app listening at <http://localhost>:${port}`)
})
- Add start script in
package.json,scriptssection
"start": "node index.js"
- Run
npm startfrom the terminal & verify if the app is running or not.
Step 2: Create a virtual linux machine
In this tutorial we are going to use Google Cloud and Ubuntu to create a VM instance. You can use any provider and linux distribution here. Just the installation and creation commands can change!
- Setup Virtual Machine For Google cloud users following is the command to create vm instance.
Note: Replace the PROJECT_NAME, SERVICE_ACCOUNT with your google cloud project and service accounts. Also you can set different machine type based on your traffic and processing.
gcloud beta compute --project=PROJECT_NAME instances create my-server --zone=us-central1-a --machine-type=e2-micro --subnet=default --network-tier=PREMIUM --maintenance-policy=MIGRATE --service-account=SERVICE_ACCOUNT --scopes=https://www.googleapis.com/auth/devstorage.read_only,<https://www.googleapis.com/auth/logging.write,https://www.googleapis.com/auth/monitoring.write,https://www.googleapis.com/auth/servicecontrol,https://www.googleapis.com/auth/service.management.readonly,https://www.googleapis.com/auth/trace.append> --tags=http-server,https-server --image=debian-10-buster-v20210512 --image-project=debian-cloud --boot-disk-size=10GB --boot-disk-type=pd-balanced --boot-disk-device-name=my-server --no-shielded-secure-boot --shielded-vtpm --shielded-integrity-monitoring --reservation-affinity=any
- Enable requests on port 3000 for this instance
Note: for the demo purpose I am enabling port 3000 on all the instances in my Google account
gcloud compute --project=PROJECT_NAME firewall-rules create port-3000 --direction=INGRESS --priority=1000 --network=default --action=ALLOW --rules=tcp:3000 --source-ranges=0.0.0.0/0
sshinto the newly created VM
gcloud beta compute ssh --zone=us-central1-a "my-server" --project=PROJECT_NAME
- Install NodeJS
sudo apt-get update
curl -fsSL <https://deb.nodesource.com/setup_16.x> | sudo -E bash -
sudo apt-get install -y nodejs
- Install
wgetfor downloading source files
sudo apt-get install -y wget
- Install
unzipfor extracting source
sudo apt-get install -y unzip
Step 3: Release the basic version and test the app
- Download the zip from github
wget <https://github.com/lakhansamani/deployment-automation-demo/archive/refs/heads/main.zip>
- Unzip the source
unzip main.zip
- Install dependenceis
mv deployment-automation-demo-main demo && cd demo
npm install
- Start node server
npm start
- Open the instance IP:3000 in your browser and you will see
Hello World
Now when your ssh connection will end this service will stop as it is not running as daemon process. In order to achieve this we will create a
systemd process for the sameStep 4: Create systemd configuration file
We will create
demo.service file in our source code and use it with each deployment.Note: Change service name, path to source and working directory.
demo.service[Unit] Description=demo [Service] Type=simple Restart=always RestartSec=5 ExecStart=/usr/bin/node /home/YOUR_SSH_USERNAME/demo/index.js WorkingDirectory=/home/YOUR_SSH_USERNAME/demo/ [Install] WantedBy=multi-user.target
There are more configurations that you can set here. Example memory requirements and environment variables. For more info you can check manual.
Step 5: Create shell script to deploy the latest release
Using shell script we will be performing following tasks.
- Download the source based on release tag
- Install the node dependencies
- Start/Restart the
systemdservice
We can put this file in the home folder of our VM and can execute it using github actions.
This script takes 1 input argument, i.e. release tag/number
Note: Please change github path, repo name while unzipping it and service in the file below
deploy.sh#!/bin/sh if [ "$1" == "" ]; then echo "Please enter version" exit 1 fi echo "upgrading demo to v-${1}" # for private repos you can use wget with GithubToken in header # example --header "Authorization: token ${GITHUB_TOKEN}" wget <https://github.com/lakhansamani/deployment-automation-demo/archive/refs/tags/${1}.zip> -O demo.zip # unzip unzip demo.zip mkdir -p demo cp deployment-automation-demo-${1}/* demo/ rm -rf deployment-automation-demo-${1} demo.zip cd demo npm install # Copy service file, incase if there are any changes sudo cp demo.service /etc/systemd/system/demo.service # reload configurations incase if service file has changed sudo systemctl daemon-reload # restart the service sudo systemctl restart demo # start of VM restart sudo systemctl enable demo
Step 6: Create GitHub action
We want to run the shell script created in step 5 and restart system process on new the release.
- Create
.github/workflowsfolder in your source code
mkdir -p .github/workflows
- Create
.github/workflows/main.ymlto run action
touch .github/workflows/main.yml
- Add workflow to
sshinto vm and run thedeloy.shscript with correct release tag
Note: add ~/.ssh/google_compute_engine Private key in your github repository secret. Also add IP address as secret so that you don't expose it unnecessarily. Also change SSH_USERNAME as per your VM
name: GitHub Actions Demo
on:
  release:
    types: [published]
jobs:
  Explore-GitHub-Actions:
    runs-on: ubuntu-latest
    steps:
      - name: Get the version
        id: get_version
        run: echo ::set-output name=VERSION::${GITHUB_REF/refs\\/tags\\//}
      - name: Debug version
        id: Debug
        run: echo ${{ steps.get_version.outputs.VERSION }}
      - name: executing remote ssh commands using ssh key
        uses: appleboy/ssh-action@master
        with:
          host: ${{ secrets.GCP_IP }}
          username: SSH_USERNAME
          key: ${{ secrets.GCP_PRIVATE_KEY }}
          port: 22
          script: /bin/sh deploy.sh ${{ steps.get_version.outputs.VERSION }}
Hurray! thats all we need. Now every time you create new release on github it will automatically deploy to you VM machine. You can also follow this process to deploy multiple services on single instance and achieve the micro service architecture here.
Here is a github repository that includes source for this demo.